Showing posts with label Lighting. Show all posts
Showing posts with label Lighting. Show all posts
Friday, January 14, 2011
A Little French Ambiance
Lots of fun things going on here. Some destructive renovation work and other pretty accents. I just ordered this beautiful light for my dining room from Circa Lighting.

Friday, February 19, 2010
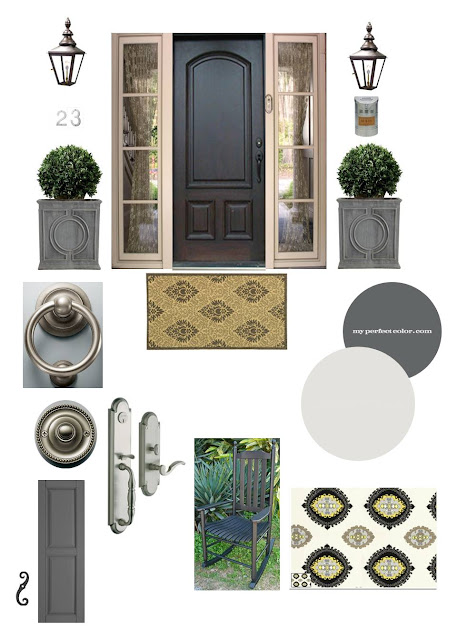
Elevation Inspiration: Our New Exterior
We are about to break ground on our desperately needed curb appeal project. Many visitors to our humble dwelling have commented on how our house is not an ugly house, but it is not a beautiful house either. Uh...thank you, I think.
So naturally I am beside myself excited that we are updating the exterior to best of our abilities. Our house is not particulary special in anyway and in fact the exterior is very angular and boring with a modern design. Sometime ago I created my inspiration board to guide me along the way. Details are below.
So naturally I am beside myself excited that we are updating the exterior to best of our abilities. Our house is not particulary special in anyway and in fact the exterior is very angular and boring with a modern design. Sometime ago I created my inspiration board to guide me along the way. Details are below.

We are completely overhauling the front door since its atrocious and adding a simply triple panel arched top with two new sidelight windows on either side. Not an exact match to the one above, but close. For the exterior we are painting the hideous peach/pink brick and trim a cool grey color and the front door and shutters will be a dark charcoal grey. All the door hardware will be in satin nickel and the handle set is Baldwin Hamilton; door knocker and door bell from Restoration Hardware. The gorgeous huge faux zinc planters are from Wisteria and the gas lanterns are just a sample of the style I love right now. The mailbox is also a brushed stainless steel from CSN. Instead of a traditional doormat I am thinking of using an indoor/outdoor rug. I think it cozies up the front porch and adds a little bit of the unexpected. This particular one is from Overstock and the size is 2.5 feet by 5 feet. And lastly we'll have an area to the side of our front door where we can put a bench or rocking chairs. Of course I'll be making some sassy and trendy outdoor pillows and I love the above Trina Turk outdoor fabric from F Schumacher.
There you have it folks, have a great weekend!
Wednesday, February 17, 2010
Beautiful and Affordable Play Room
Do you love the way this gorgeously styled play room looks? Could you envision it in your own home and does it make you yearn for an interior designer?

Okay so let's start with what you might not have in your kid space, beautiful hardwood floors, 8" baseboards, beautiful AND expensive wood double hung windows and of course that arched window seat. But aside from the architectural details, the styling of the room is perfection and yes achievable.
Would you believe the meat and potatoes of this room comes from Ikea and a few other chic and cheap retailers? Allow me to demonstrate....
First we'll start with Ikea, where you'll find about 80% of the items for this design. This rug is not the exact same as the photo, but a very close second and you can't beat the price.


Photo from Sloan Mauran ID
If you answered yes to any of the above, then you are not alone. I too stopped dead in my tracks and wished my upstairs rec room looked like this. Well my friends, good news! This gorgeous and yes totally affordable room is more achievable than it looks.
Okay so let's start with what you might not have in your kid space, beautiful hardwood floors, 8" baseboards, beautiful AND expensive wood double hung windows and of course that arched window seat. But aside from the architectural details, the styling of the room is perfection and yes achievable.
Would you believe the meat and potatoes of this room comes from Ikea and a few other chic and cheap retailers? Allow me to demonstrate....
First we'll start with Ikea, where you'll find about 80% of the items for this design. This rug is not the exact same as the photo, but a very close second and you can't beat the price.

The ever so popular Ikea toddler table and chairs.


The bookcase...Ikea as well.

Or the Ikea Expedit turned on its side.

Some baskets to fill the shelves.

The comfy armchair in pink if you have girls or if you are striving for gender nuetral, the red.


The apple green pillows, also Ikea.com.

And the wall art. Frames from Ikea and wall cards from LandofNod.com.


And finally the biggest splurges for this very affordable room, the beautiful gord lamp and custom roman shades. The lamp is from LampsPlus.com and the fabric is an apple green cotton duck from fabrics.com. The perfect fabric for a simple roman shade.


So there you have it, high style for a steal. keep in mind this design works beautifully because the bold furniture and asseccories are accented with clean crips neutral walls.
Monday, October 19, 2009
I Heart This
I have been obsessing over the Paris Flea Market chandelier from Visual Comfort for a long time. The only thing that makes me question it's presence in my home is it's price tag. Gulp.


But then along came the Genevieve 12-Light Chandelier from Ballard Designs and suddenly it's a whole new ballgame. Hmmmmm.....better price, but I can't get Paris out of my mind.

Thursday, October 15, 2009
Fabulous Blog Alert
.jpg)
I have to share with you a blog I have recently become obsessed with, copycatchic.com. The writer takes random home decor items and does a comparison of the exact if not very similar item at different price points.
For example, this post highlihts this beautiful chandelier from Horchow.com for $725. Ouch!
.jpg)
And then she goes and finds it at Overstock.com for $119.99. What?!?!?! Can this be right???? The entire blog is full of crazy money saving finds like this one.

Wednesday, August 19, 2009
House Update: A Little Before & After
As promised I'll slowly reveal a few after photos of our house renovation. I'll reveal them slowly because that's the pace this reno is moving-very, very slowly. Life just seems to get in the way.
So, here's are entry hall BEFORE. Boring beige walls, 7 foot ceilings (that's right, you read it correctly 7 feet), brown tile, brown/brass faded hardware and old slab doors with about 8 coats of paint.

And here's the AFTER. We raised the ceiling about 18 inches, laid new hardwood floors, added crown molding, raised paneled doors and nickel finish hardware. Click on the photo to enlarge for detailed shot

If you're interested here are the specs on the new space; wall paint Elmira White from Benjamin Moore, molding and trim Bennington Gray from Benjamin Moore, pendant is Simple Scallop pendant by Barbara Barry from Circa Lighting, table is Ethan Allen, basket is Crate and Barrel, rug is from a local Persian dealer, blue and white vase with flowers is old from Bombay Company, small blue and white vase if Victoria Hagan for Target, large blue and white plate is from ZGallery, blue and white ginger jar is from Home Goodes, floors are wide plank Potomac Plank from Lumber Liquidators, mirror is vintage and dog is a mut from the SPCA. Oh and the blue paint is my bedroom Wedgewood Gray from Benjamin Moore, but more on that later.
I would like to paint three large horizontal tone on tone stripes on the wall with the mirrow, but for now I'll just enjoy the crisp clean new space. There just never seems to be enough time. If I get around to it I'll post an updated photo.
Tuesday, August 4, 2009
A Fancy $5 Fix Up (How to Make a Custom Shade)
I am going to start a series of DIY projects I plan to share with you as I chisel away at decorating my home. I’ll try to keep them as simple as possible while maximizing high style for your home.
This first project I have affectionately named my Fancy $5Fix Up because I had to come up with a cheap shade solution for my Haberdasher sconces. They cost more than I wanted to spend so I had to get crafty!

I started with two parchment paper shades I purchased at The Great Indoors for $2 and rummaged through my piles of scrap fabric and samples that clutter up my studio ($0 for the fabric). If you don’t have fabric on hand ask a friend who sews if they have any, you only need half a yard.

The supplies you’ll need to finish this project from beginning to end are below with links where you can buy most of the items. If you don’t have all these items on hand this project will be more like a $25 fix up but nonetheless still very inexpensive. If you have a friend with these items ask if you can borrow them, it will save some you some money.
Supplies:
Fabric cutting scissors
Craft paper (or old wrapping paper)
Marker
Ruler
Bias Tape
Fabric Pins
Spray Mount Glue
Fabric Measuring Tape
Iron
Iron on Adhesive
First I had to make a pattern to cut out the fabric for my shades. I made one by rolling the shades along a piece of craft paper while tracing the curve with a marker. After I traced the shade I connected the two curved lines with a ruler. Here’s a tip; start with the seam of the shade against the paper and roll the shade around until the seam reaches the paper again. This will give you a pattern that wraps completely around the shade. Then I cut out my paper pattern and pinned it to the fabric and cut out my pattern.


Before I glued the fabric to the shade I did a dry fit to make sure the fabric fit all the way around and my seams overlaped in the back. To stick the fabric to the shade I sprayed the fabric and not the shades then slowly wrapped the fabric around the shade while smoothing out any bumps or ripples. The spray mount glue is usually very forgiving so you can pull it up and reapply if necessary.

To finish off the shade I made custom bias tape out of the same fabric. Now this step is not a beginner level at all; so I would suggest if you are not familiar with basic sewing steps buy some already made bias tape from your local fabric store. You want extra wide double fold and you can buy it at any fabric store (it’s cheap). Here what it looks like and one package is all you need.

To figure out how much bias tape needed, do a dry fit of the top and bottom then cut your lengths. I always add an extra inch to overlap and edges and give me some room to play. Using your iron on adhesive and following the directions on the package (this is very important; read all the directions first) Iron on a strip of adhesive to the bias tape (with the tape lying open, see photo) then iron the fabric with tape onto the shade.


Ironing the tape onto the shade is the most time consuming step. You have to go slow and rotate the shade around as you iron. The iron on adhesive actually sticks as it cools so take your time and try not to burn your fingers. Here’s a tip; I would iron a small section at a time and set the iron down holding the bias tape in place to let it cool till I made my way around the entire shade and clipped my end. I repeated that process for both top and bottom. Also align all your seams to the back of the shade so they don’t end up in the front.


.JPG)
Well friends, I hope this isn’t too confusing. Email me if you have questions vwalton@jacquelynreese.com. I should also let those of you know who aren't aware, you can buy design-your-own shade kits through Hollywood Lights if you want to spend a little bit more money.
Thursday, July 30, 2009
Navy and Orange Nautical Nursery

Since I’ve been favoring designs for girls lately, I thought I should throw some love to the boys. So here’s a nautical nursery that’s all sophistication and royal regatta with nothing “dingy” about it. Get it? Okay bad pun. Click on the photo to get the full details.
I try to avoid theme decorating at all costs. If it’s not done properly it can look very cheap. It takes a great designer to pull off a room designed with a theme and make it look fabulous. So here I’ve designed a boy’s nursery that isn’t in your face nautical theme, just sophisticated and modern with subtle hints.
I chose a gorgeous Ralph Lauren large navy and white stripe as my starting point. The chair pictured on the inspiration board is obviously not a rocker but you can see how striking the fabric is when laid on the horizontal. Coordinating fabrics are the geometric orange and white and flax linen. I love the organic look of flax linen.
As for the walls I would add a white bead board all the way around the room covering ¾ of the wall height and the rest of the walls painted a soft oatmeal color. The bead board gives the room an east coast Nantucket feel. The paint swatch to the left of the chair is Oatmeal by Serena and Lily.
The crib is from Restoration Hardware and I think it’s safe to say I am head over heels in love with it. It’s sophisticated and the best part is it converts to a full size headboard! The rug is a soft wool but in a very natural color favoring a woven seagrass. If this was a toddler’s room I would have shown a true seagrass rug, but since it’s for a baby I went with the wool.
Instead of a chandelier or hanging fixture I chose a flush mount antique nickel star. It reminds me of how you would see the North Star late at night in the middle of the ocean on a yacht. I wish! A few other design details not pictured would be adding long curtain panels with grommets. The grommets remind me of a boat’s sail or a true sailor’s knot as curtain tiebacks.
Shopping Guide:
Fabrics: www.CalicoCorners.com
Monogram: JacquelynReese.com
Rug: Pottery Barn
Light: Circa Lighting
Crib, Changing Table, Porthole Mirror and Fan: Restoration Hardware and RH Baby and Child
Art: www.NameYourDesign.com
Bead board Toy Box: Land of Nod
Mobile: Gap.com
Hat: RalphLauren.com
Shirt: Janie and Jack
Paint: Serena and Lily
Garden Seat Table and Arrow Sign: Ballard Designs
Tuesday, July 28, 2009
It’s a wrap!
Looking for a way to spruce up your old sconces and chandeliers? Then check out these gorgeous lighting wraps from www.kaarskoker.com. I love how these simple wraps bring a modern update to a traditional element. I just ordered these two for my studio chandelier. I am going to alternate patterns on the 8 arms.


And I am going to order one of these for my daughter’s chandelier. Remember my blue and pink design? See it here.

These were brought to my attention by my friend Rachel, who spotted them on a fabulous blog you should definitely be reading. Christie Chase who pens Christiechase.blogspot.com is an uber-talented writer, artist and do-it-yourselfer who blogs about her trials and triumphs of transforming blah furniture and decorative items into fabulous one-of-a-kind pieces. Christi is a local gal who purchased an old bungalow in a historic neighborhood in Houston. I love visiting her stylish abode and soaking up the details.
Below is just a sampling of the many lighting sleeves Kaarskoker sells. Visit their site to preview them all.


Monday, July 27, 2009
Black and Pink Boutique Chic
Let me start this post by saying this room design was A LOT of fun. I love feminine rooms and this one is all out girly. About a week ago I received an email from a mom who reads this blog and wanted to know if pink, black and damask wallpaper would work for a toddler’s room or would it be too much. Here is her question;
My lil one just turned two on July 3rd and we were already planning on transforming her room. I was thinking something fun, pink, black, damask wall paper, boutiquish (if that's even a word ..lol) for her room. Would that be too much for a lil girls room?
My immediate thought was, “How freaking cute would that be for a girl’s room, I want to design a room with that theme.” So I replied back saying stay tuned I would give her some guidance. Below is the room design, but I have added a few design comments below along with a shopping list. Click on the image to enlarge.

Pink and black is a beautiful combination, but you need to keep certain elements to a minimum or your room will end up looking like a Victoria’s Secret store. I would recommend keeping the wallpaper damask pattern to a soft pale pink. I found a paint swatch at Home Depot to help, Ralph Lauren’s Verona Pink VM45. You don’t have to use Ralph Lauren paint because it can get a little pricey, but it’s a good starting point. The wallpaper in the design I found at www.Lowes.com, but I was recently told they don’t sell wallpaper in the stores anymore. Again a starting point if you can’t get your hands on a sample. If you’re going to wallpaper the entire room keep the pink a powder pink tone. Another option would be to only wallpaper the wall the bed is against and paint the other walls a complimentary pink. That can help save some money if the budget is tight.
The fabrics selected are samples only because there are so many options available, but if you are going with damask wallpaper avoid a damask print fabric. Too many competing patterns. I recommend adding a dove gray color in the fabrics as a complimenting color. The tiny dot fabric swatch in the design is actually a soft gray color.
Black can be a dominating element to any design so select only a couple of key black pieces and the rest are tiny accents. For example the black dresser and dress form are large pieces and the pillow and picture frame are delicate accents.
The dresser and nightstand are from Ikea so don’t worry if the kids beat the crap out of it, it’s okay it was cheap. The art is from one of my all time favorite artist Janet Hill. They are inexpensive prints to help keep the budget in check.
A few side notes; the lighting in this design are serious budget busters, but you get the idea. I am sure you can find some reasonable alternatives with the internet. Also, there are a lot of pink tones in this inspiration board-do not perceive that as a design tip. Stick with two dominating tones max. This board is a sample only. Enjoy!
Shopping Guide:
Fabrics – www.JacquelynReese.com
Custom monogram – www.JacquelynReese.com
Mirror – www.Horchow.com
Dresser and Nightstand – www.Ikea.com
Rug, Beanbag, Dress form, Storage Basket, Vanity Seat – www.Potterybarnkids.com & www.Potterybarnteen.com
Pillow and Flower Knob – www.Anthropologie.com
Headboard – www.BallardDesigns.com
Jacket – www.JanieandJack.com
Shoes – www.jcrew.com (crewcuts)
Wallpaper – www.Lowes.com
Frames – www.PaulaPrass.com
Artwork – Janet Hill Studio http://www.etsy.com/shop.php?user_id=5535176
Chandelier – Petite Paris Flea Market available at www.CircaLighting.com
Lamp – www.christopherspitzmiller.com
Friday, July 24, 2009
A Tole Tale About A Chandelier
I think I finally found the chandelier for my daughter’s room. This was quite the arduous task since there were so many stipulations. First it had to be the right size and height because we have ridiculously low ceilings on the second floor where her room is, I am talking 8 feet (remember my house is 50 years old). Second, it had to be “reasonably” priced. If you’ve shopped for lighting lately you know what I mean. Light fixtures can get insanely expensive and since this is for my daughter’s room I was not about to drop a pile of cash. And third, it had to be tole style, but not gaudy. I like a balance of traditional and modern in my home and the chandelier needed to be a traditional element.
Whew! I searched high and low and I hope (fingers crossed) I have finally found one. I ordered it today from www.Laylagrace.com. The cheapest place I could find it. It needs to fit and it better fit because if not there’s a 25% restocking fee. Yikes!

Whew! I searched high and low and I hope (fingers crossed) I have finally found one. I ordered it today from www.Laylagrace.com. The cheapest place I could find it. It needs to fit and it better fit because if not there’s a 25% restocking fee. Yikes!

Subscribe to:
Posts (Atom)